![MenuMetric_500_130.png]](https://support.menumetric.com/hs-fs/hubfs/MenuMetric_500_130.png?height=50&name=MenuMetric_500_130.png)
For the convenience of our dealers, we have created the ProviderLink workflow of MenuMetric. The intention is to give a simplified faster process to link our dealers to their providers. The functions of this process focus on only rating and contracting.
Note: Reporting can be included as an additional function to this workflow. Please contact us if you would like reporting added to your store.
This article will give you a step-by-step guide on how to use the ProviderLink workflow. If you have any questions beyond the answers here, please call our support line!
Step-by-Step Guide
- Start your deal using the + New button.

- If your account has DMS integration you will have 2 options, Manual or Import. If you do not have DMS integration, your deal will simply start. The workflow will be the same as the Manual example which we will be covering in this article.
- Manual: You will fill out the details of your deal. (For this example we will proceed with this option)
- Import: Import your sales from your DMS. View the following article to learn more about importing. Importing a deal from your DMS
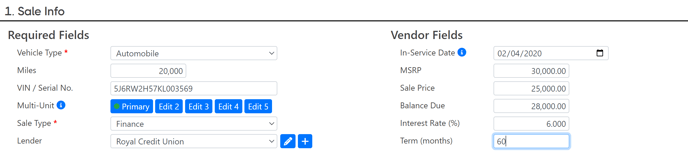
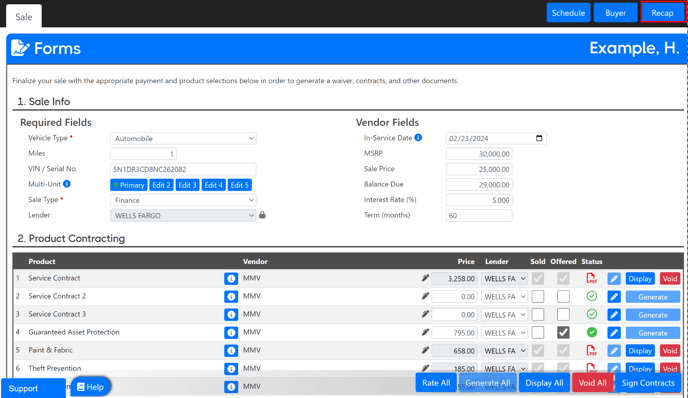
- You will start by filling out 1. Sale Info with your deal details. The fields in this section may be subject to change depending on the Vehicle Type you have selected. For today's example, we will continue with an Automobile.
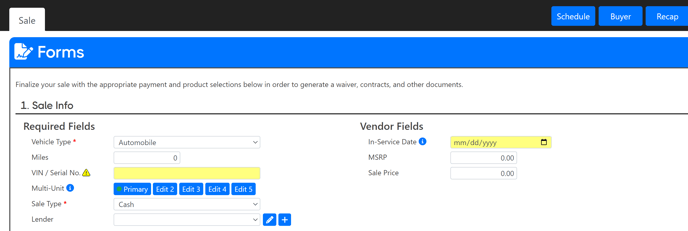
- Vehicle Type: This is where you will set the type of vehicle you are looking to rate and contract for in your deal.
- Miles: Enter the miles for your unit.
- VIN/Serial No.: Enter the VIN of your unit.
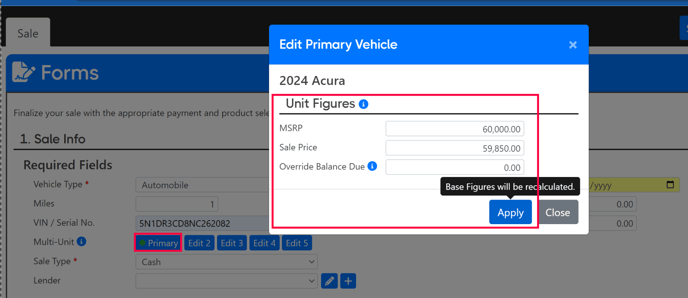
- Multi-Unit: Select the Primary button to input the MSRP and Sale Price of your Primary unit, then click Apply. If you only have one unit for your sale, you may continue on to the next step ignoring Edit 2,3,4 and 5. If you have multiple units for your deal select Edit 2 and so on to add your additional unit(s) information.
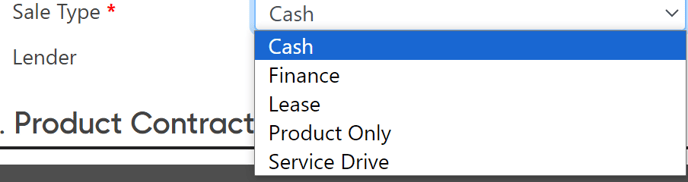
- Sale Type: In here you can set your sale, type. You have options for Cash, Finance, Lease, Product Only, and Service Drive. The Sale Type will change the required fields under the Vendor Fields section.
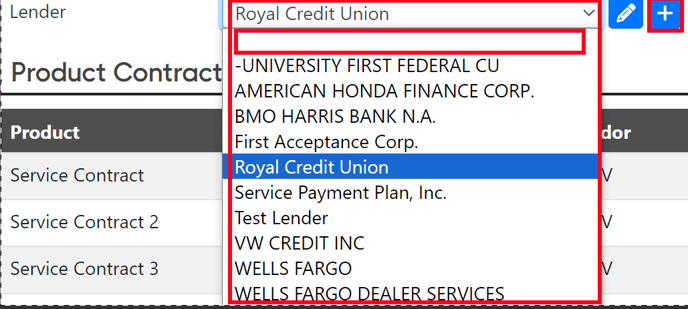
- Lender: You can select your lender using the drop-down.
- If you do not see the lender you are looking for, you can easily add it using the plus button found to the right.
- Select the blank entry found at the top of the list if you are doing a cash deal.
- In-Service Date: Some vendors require the original In-Service date of a unit when contracting. You can enter it here. The date needs to be within 1 year of the units manufactured year. ( Example: A 2014 car would need to have an In-Service date somewhere between Jan. 1, 2013 and Dec. 31, 2015.)
- MSRP: In this field, you will enter the book value of the unit you are selling. The MSRP is frequently required information on VSC and GAP rates but may vary depending on your vendor.
- Sale Price: Enter the raw sales price of the unit. If you are doing multiple units, this field will total the Sales Price entered within your Multi-Unit section. (See step3. D)
- Balance Due: Put your total front-end balance due before F&I products.
- Interest Rate(%): Here you may enter the interest rate of the loan.
- Term (Months): Enter the term of the finance/ lease loan in Months.
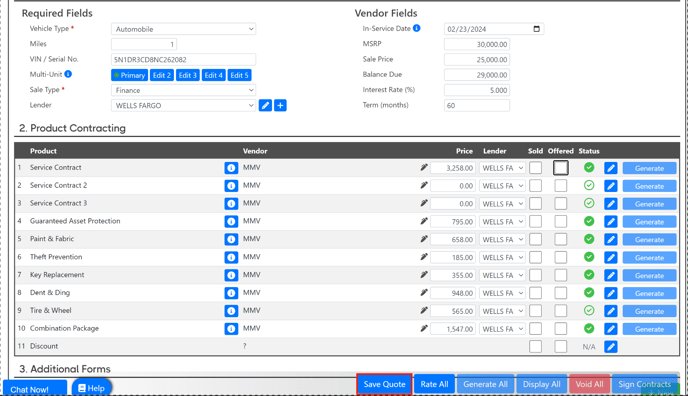
- Once you have completed all of the fields in 1. Sale Info, your deal will look something like the following image. You may now move to the next section 2. Product Contracting.
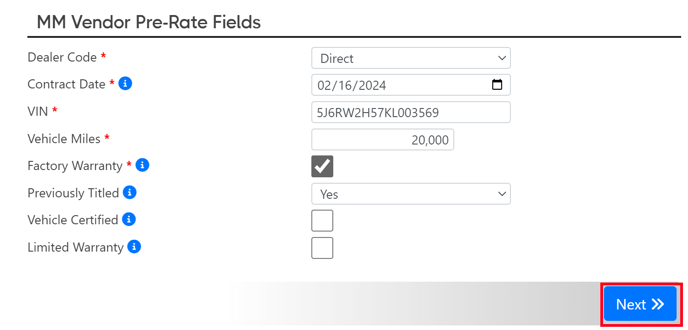
- From 2. Product Contracting select the Rate All button found in the bottom right of your screen.

- The Rate All Pre-Rate Fields pop-up will appear. The required fields will vary depending on your vendor's requirements and the deal criteria you had set during the 1. Sale Info section. Fill out all Pre-Rate fields to the specifications of your deal criteria. Click Next when you are done. It may look something like the following.
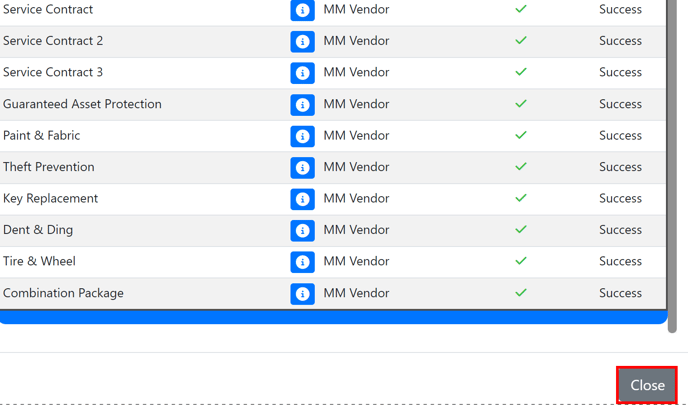
- The information you entered into your deal thus far will be sent to your vendors. Your vendor will process that information and return lists of coverages based on your deal criteria. A Success message will be shown in the status of your product as the coverages are returned to your deal. You can click Close once your products have finished.
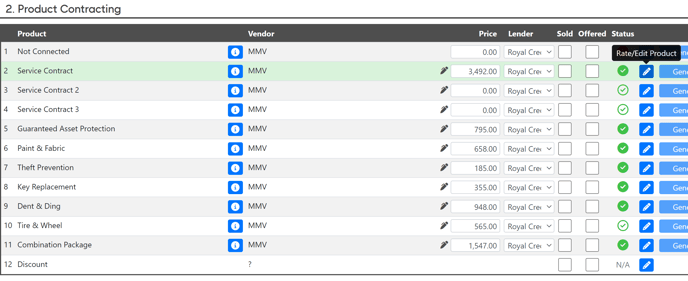
- Now that the lists of coverages have returned, you will need to go select which specific coverage you would like to quote to the customer. Select the pencil button next to the product entry.
-
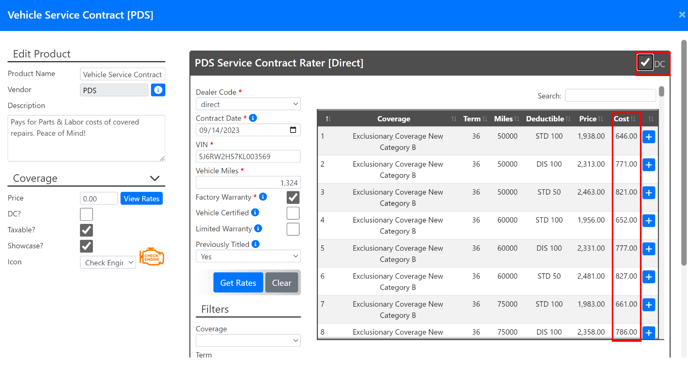
You can scroll through the options or use the Filters section to narrow the list down.

-
At the top right of the pop-up, you can use the "DC" checkbox to make the dealership Cost appear within the list of coverages.
-
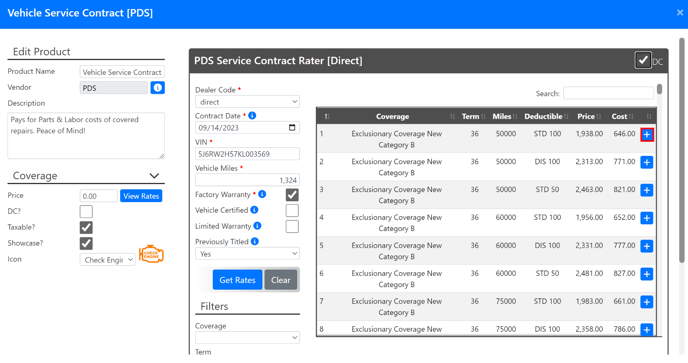
Once you have decided which coverage you would like to present to the customer, select it using the blue "+" button.
-
Any Surcharges associated with the coverage you selected will appear in a pop-up. You can select the applicable options using the check box next to each surcharge. The Price of the surcharge will be applied to the price and cost of the product. Once you have finished your surcharge selections, click "Apply".

-
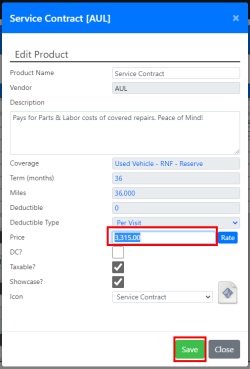
After selecting the desired coverage, the window will shrink and you'll have an opportunity to edit the retail price before saving the change to the menu.
- Repeat steps 8 -14 for all of the products you wish to quote to the customer.
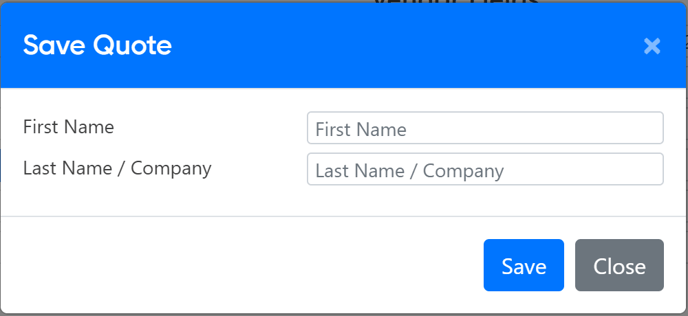
- At this point, you can select the Save Quote button to save your quotes for the customer.
- A pop-up will appear for you to put the customer's name so that you may remember who the quote is associated with. Enter the customer's name and then select Save.
- The deal entry will now appear in your Sale List for you to come back to later.

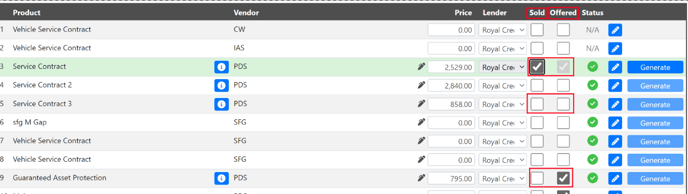
- When you come back to the deal for contracting, you may start back up in the deal under the 2. Product Contracting section. Appropriately mark your Sold and Offered boxes.
-
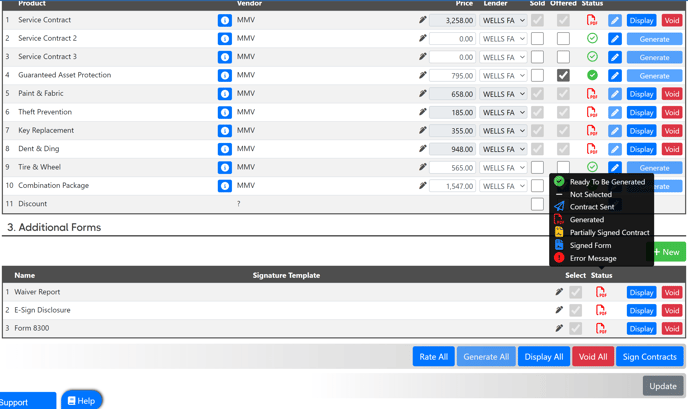
The " Sold" column indicates which products are being purchased by the customer and are ready for contracting.
The "Offered" column indicates which products were shown to the customer, but not necessarily proceeding with purchase. You may add and remove the checkboxes for the Offered column manually as needed.
Products that are marked as Sold and Offered will appear in the Purchased section of your Waiver Report (Found in Step 3. Additional Forms). Products not marked as Sold but marked as Offered will appear in the Not Purchased section of the Waiver Report. Products that are not marked as Sold or Offered will simply not appear on the Waiver Report seen in 3. Additional Forms. See the screenshot below.
-
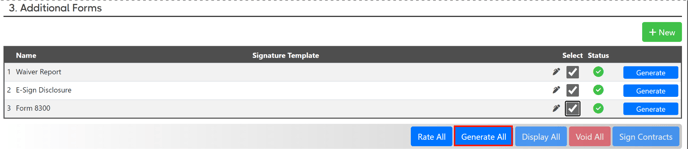
- Once you have appropriately marked your products, you can move down to 3. Additional Forms. Select any of the additional forms you would like to contract alongside your product contracts. By default your account will include the following
- Waiver Report: This is an accept-decline form used for compliance.
- E-Sign Disclosure: If you are having the customer e-sign their contracts you can have the E-Sign Disclosure generated as a PDF for the customer to review.
- Form 8300: IRS report form for cash payments over $10,000.
- Once you are done making your selections in 3. Additional Forms, you may select the Generate All button.
- If you had not previously filled out all of the customer's information, it will ask for it now. Fill out all fields that apply. The yellow highlighted fields are required. If you do not have a Co-Buyer you may leave that section blank.
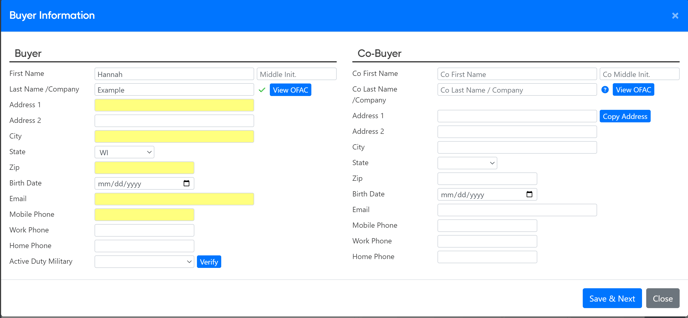
When you are done filling this section out. It may look something like the following. You will note that the OFAC is automatically run on the customer information. Click here to learn more. Select the Save & Next button when you are done.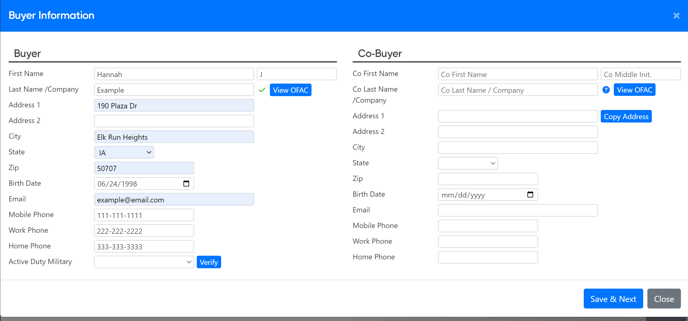
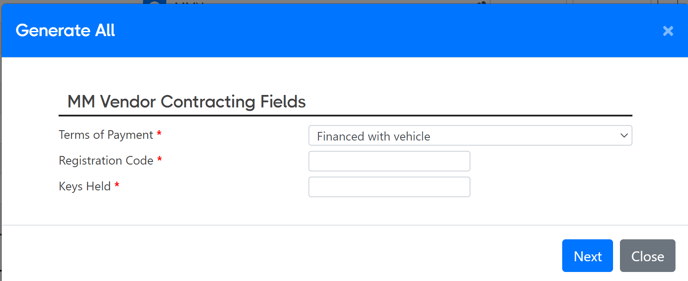
- If your vendors require any additional information your Pre-Contracting fields will appear. These fields will vary depending on your vendor's requirements. Any fields labeled with a red asterisk are required. It may look something like the following. Select the Next button when you are done.
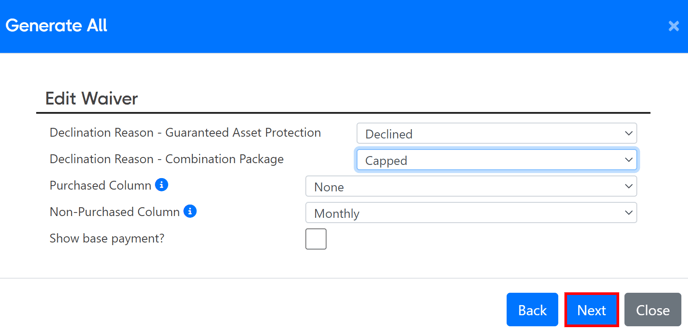
- If you select the Sale Waiver, it will ask you to set your visual display preferences. Make your adjustments to suit your deal scenario. It may look something like the following. Select the Next button when you are done.
- Your Additional Forms will be generated right within the MenuMetric system. Your product contracts will go through a Generating Progress. Our system will take the deal criteria you have previously entered along with the coverage you selected at rating. The information is sent to your vendor. The vendor uses that information to make your contracts and will return them back to MenuMetric for platforming. Once the contracts have returned You will receive a Success message once the contracts have been returned. You may now select Close.

- Your screen may look something like this. You can see that the Status Icons have changed to a red PDF indicating that you now have active contracts. If you ever need to know what the Status Icons mean, hover your mouse over the word Status for an Icon key.
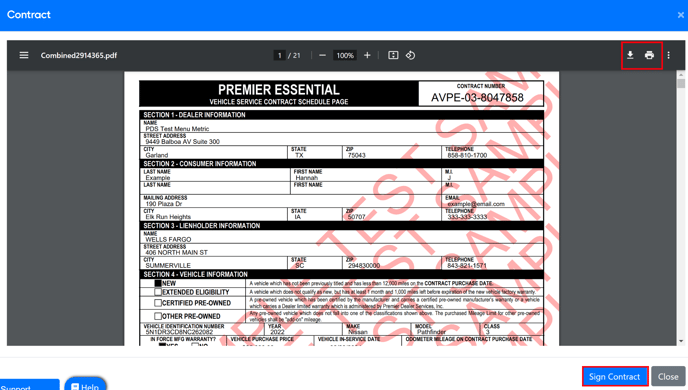
- You may now select the Display All button to review your contract PDFs in one PDF file.

- From here you can either download and print your contracts for wet ink signing or use the Sign Contracts button for eSigning. Check out the ESigning video to learn more.
- Once you are done with signing, you may select the Recap button found at the top right of your screen.
- Your Recap pop-up will appear. Fill out the information on this page for reference in the future and reports. Once you are done select Save and then Finalize Sale. Sales that are NOT in Finalized Status will NOT appear in reports!

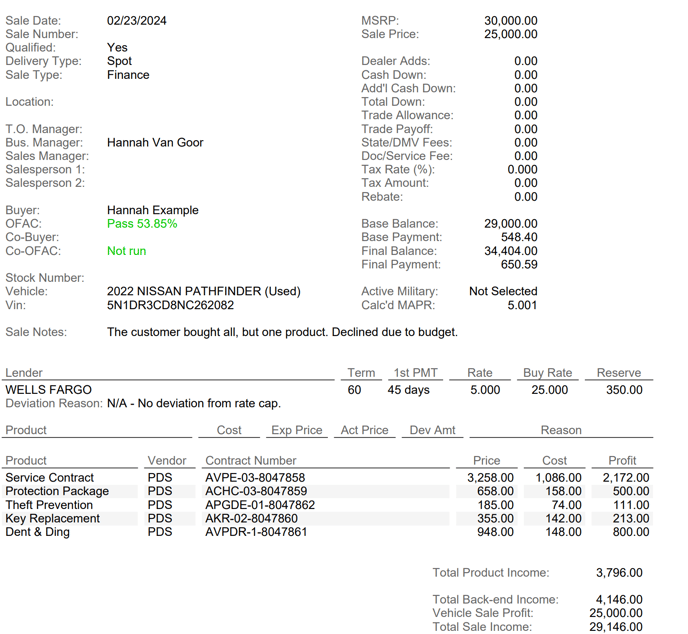
- Once yourSale is in Finalized status the Recap Report button will appear. You may select the button to display your Recap Report. It may look something like the following.
- You may download or print it using the icons found at the top right of the PDF viewer.

- Once you are done with the Sale Recap you may return to your deal. At this point, you are finished with your sale. If you ever need to make changes post-sale, take your deal back out of Finalized status by selecting the Edit Sale button found in the Recap section.

- This will bring you back to your Forms page where you may void your contracts and make updates. There are a few things you want to keep in mind when you void your contracts.
- Once you void your contract, that contract number is gone and will never be used again. When you make a new contract, it will have a new contract number.
- You can void up until the point when your vendor has finalized your contract, this is typically the point of remittance but may vary depending on your vendor's requirements.
- When you make changes it is important to void and recontract your Sale Waiver to reflect your changes.
- Once you have completed your post-sale changes you may repeat steps 28-30 to re-finalize your sale.