![MenuMetric_500_130.png]](https://support.menumetric.com/hs-fs/hubfs/MenuMetric_500_130.png?height=50&name=MenuMetric_500_130.png)

The eForms page is where you will process all of your product contracts as well as print additional waiver (accept/decline) forms. MenuMetric features live contracting with nearly 200 product vendors. The contracting process communicates directly with your vendor's contracting system, allowing the vendor to create the contract on their side and send the completed PDF to MenuMetric.
This means that MenuMetric will never have contracts that are out of date, and because your vendor creates the contract it is immediately available in the vendor's portal for claims and remittance.
View the instructions below to make your contracts!
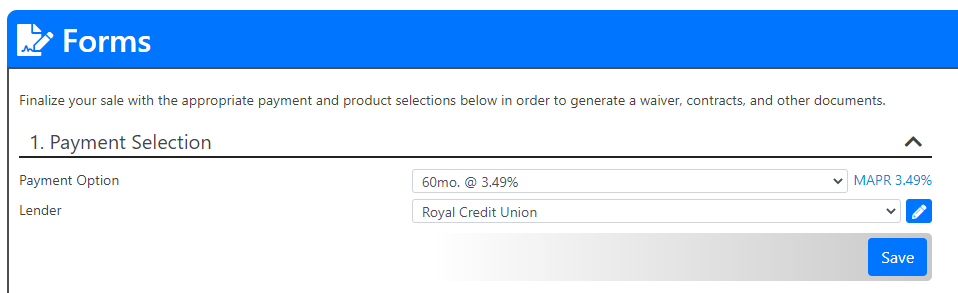
Step 1. Payment Selection
Choose from the rate/term options that were presented to your customer and ensure the appropriate lender has been selected. If you imported your deal with the lender already entered in your DMS, it will automatically show here. If you did not import with a lender or you are doing a manually entered deal, you can choose the lender from the drop-down. (Don't see your lender in the list? Click here to learn how to add lenders to MenuMetric).
Note: You can edit the lender info by clicking the pencil next to the lender name.
Click "Save" to move to Step 2. Product Contracting.
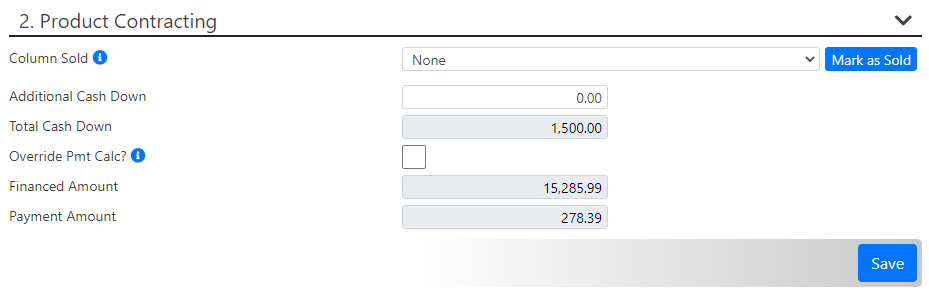
Step 2. Product Contracting - pre-contracting adjustments
In step "2. Product Contracting", prior to processing contracts, you can make a few adjustments.
- Use the "Column Sold" drop-down to select which column of products the customer purchased (if using a printed menu) and click "
 ". If the customer did not select one of the columns, you can individually select each product as shown in the next section.
 - Adding additional cash down to your deal? Click the "Override Pmt Calc?" check box to edit the "Financed Amount" and "Payment Amount". These numbers will print on your contracts, so be sure to double-check prior to generating contracts. If you have already generated your contract and need to make an adjustment, simply Void your contracts, make the adjustment, and then regenerate.
- Click "Save" before moving on to processing the contract.
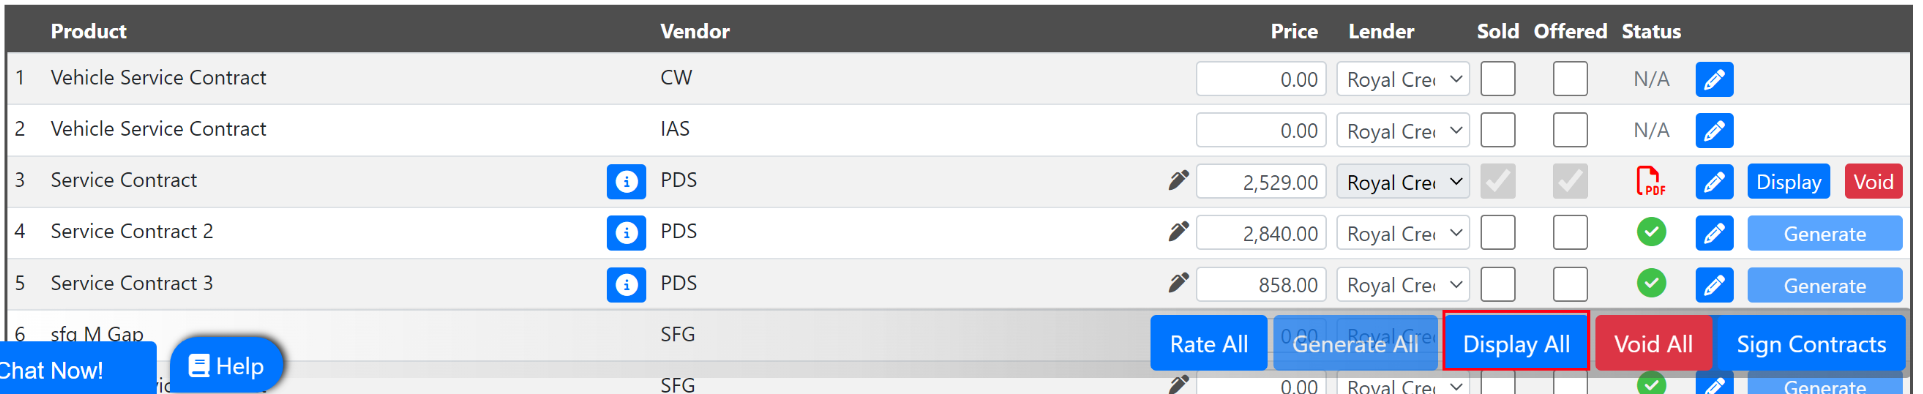
If you selected a column to mark as sold, or if the customer used a digital menu to make their product choices, you will see the appropriate products marked sold in this section.
You can manually make adjustments on the fly by clicking the "Sold" check box for each product to add or remove as needed. The " Sold" column indicates which products are being purchased by the customer and are ready for contracting.
The "Offered" column indicates which products were shown to the customer, but not necessarily proceeding with purchase. Products will automatically be marked as offered based on what was implemented on your Layout page. You may add and remove the checkboxes for the Offered column manually as needed.
Products that are marked as Sold and Offered will appear in the Purchased section of your Waiver Report (Found in Step 3. Additional Forms). Products not marked as Sold but marked as Offered will appear in the Not Purchased section of the Waiver Report. Products that are not marked as Sold or Offered will simply not appear on the Waiver Report. See the screenshot below.
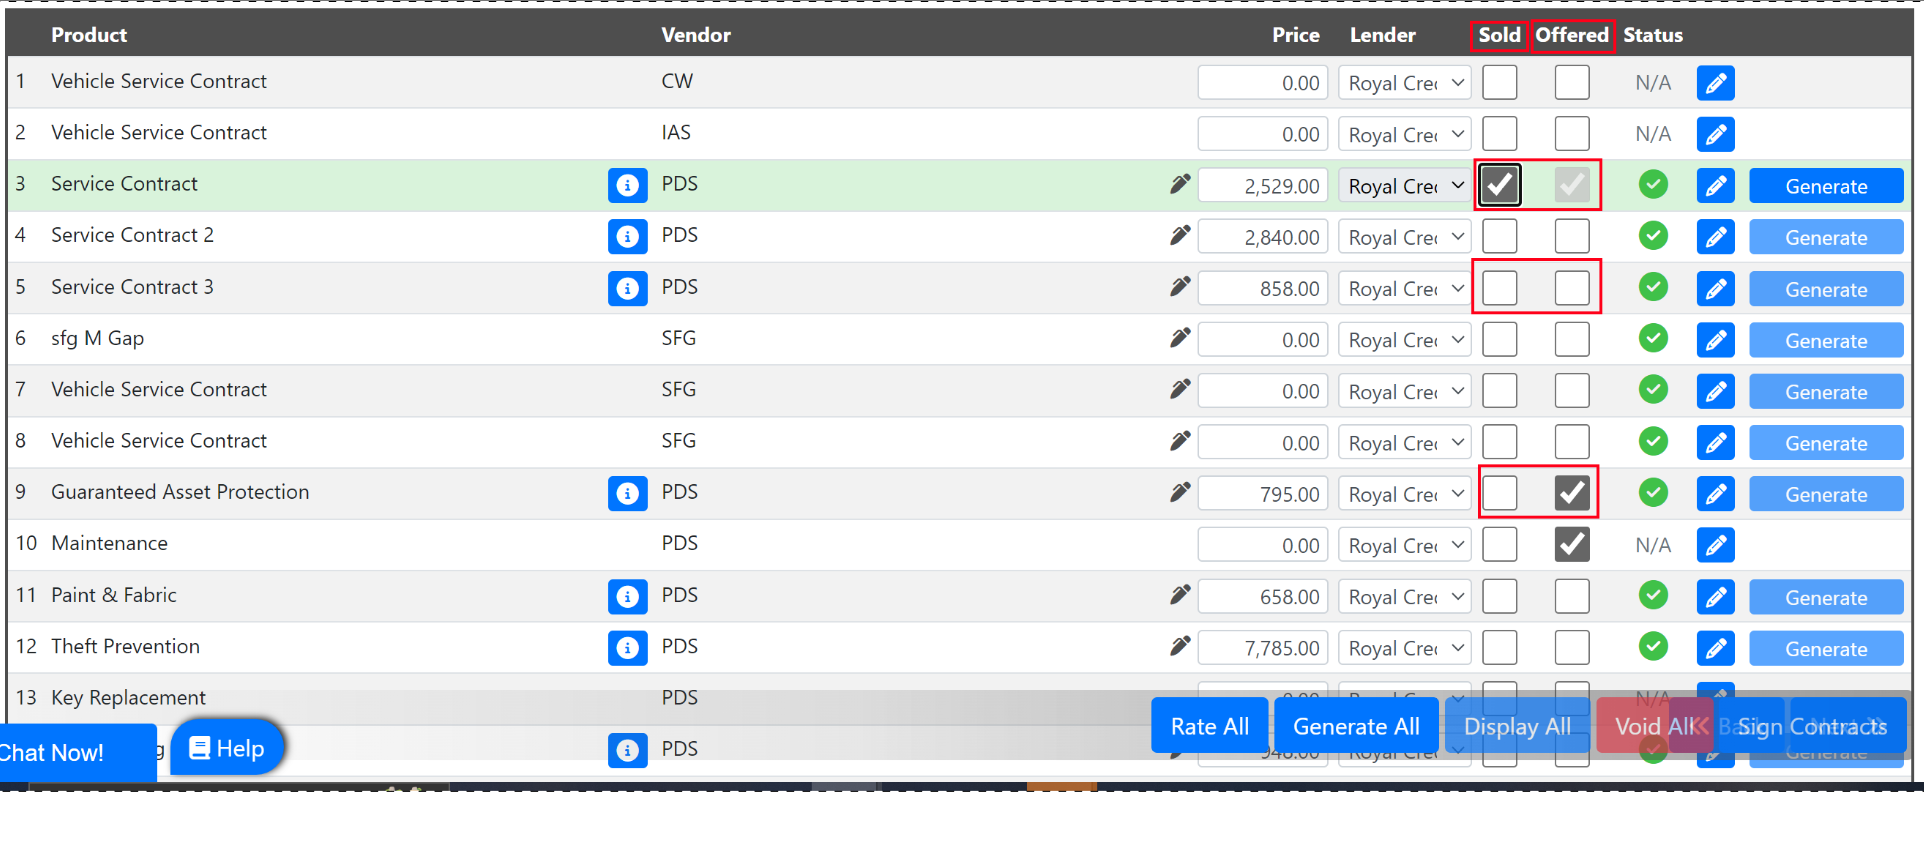
Once you have your product appropriately marked, use the black down arrow to open up Step. 3 Additional Forms.

Step 3. Additional Forms
This step will show additional forms that are available to be printed. Simply use the checkboxes in the Select column to determine which forms you would like to generate.


Now that you have your Products and Forms appropriately marked we can start generating!
Product & Form Contract Generation
There are two ways to generate your product contracts.
1) Generate All - If you are confident that all of the information and your product selections are correct, simply click "Generate All". This will send the contract request to your vendors, their system will make the contracts and send the PDF forms back to MenuMetric.
TIP: All products must have a Green Circle with a checkmark in order for Generate All to work properly. See below for a Status Icons list to view all Status'.
Your selected Foms will generate alongside of your contracts.

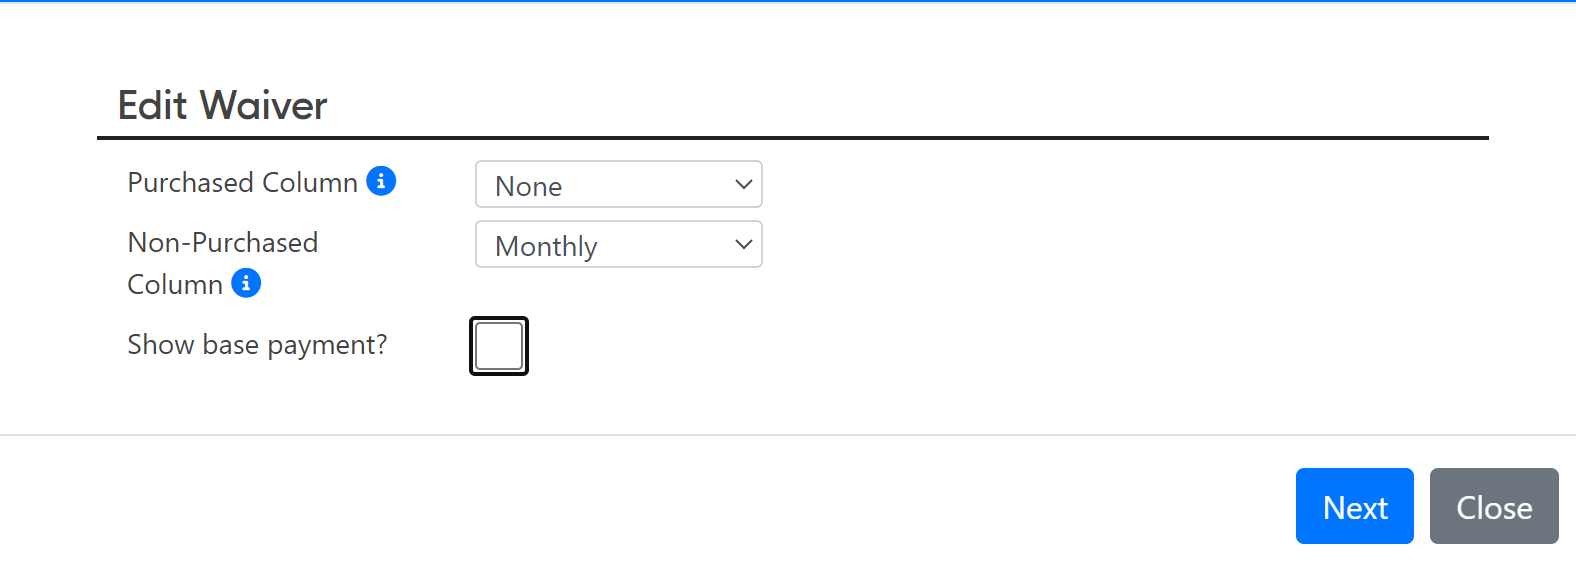
If your Waiver Report was among your selected forms, a pop-up will appear for you to customize your waiver.
- Purchased Column: You can use this field to determine how you would like the payment to appear for individual products on the products the customer is purchasing.
- Non-Purchased Column: You can use this field to determine how you would like the payment to appear for individual products on the products the customer is declining.
- Show base payment?: If you would like the Base Payment to appear, check the check box for this field.
When you are done making your changes, click Next to proceed with contracting.
2) Generate each contract individually - If you are missing information, get a contracting error, or need to update the product you are selling, simply click the Generate button next to the product or form.
![]()
If there are errors when processing a contract a Red circle with an exclamation point will be displayed. You can view the error message by hovering over the red circle icon.
Click "Save and Next" to continue to the Logging Page.
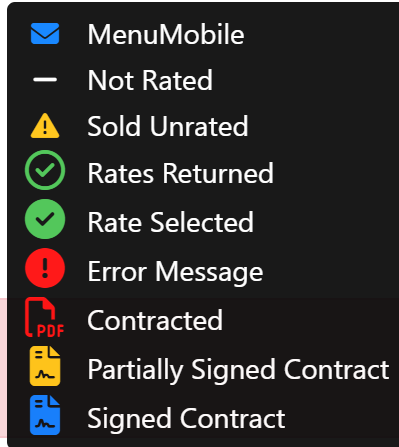
Status Icons
- MenuMobile: This indicates that the customer selected this product when using MenuMobile.
- Not Selected: The product was not rated. The rating can be completed from the Layout Page or by marking it sold and clicking the "Contract" button for that product and then "Rate". Click "Get Rates". Select your coverage, and then press "Save".
- Sold Unrated: You have marked a product as sold to the customer without assigning an electronic coverage to contract with. Use the pencil button within your product entry to add a rate.
- Rates Returned: This indicates that the rating process has been completed, but no options have been selected. Click "Contract" and then "Rate" to select coverage. Be sure to save your changes.
- Rate Selected: The product has an electronic coverage assigned and is ready for contracting.
- Error Message: The product vendor has returned an error. Hover your mouse over the icon within your deal to view the error message.
- Contracted: The contracting process is complete and a contract PDF is available to view, print, and sign.
- Partially Signed Contract: If 2 parties are buying and only one of them has electronically signed, the partially Signed Contract icon will appear to let the business manager know that more signatures are still needed.
- Signed Contract: The PDF has been electronically signed by all needed parties. Click here to learn more about signatures.
Displaying or Making Post-Contracting Changes
After a contract or additional form has been generated, you can view the PDF by clicking "Display". You may void contracts and forms individually by using the "Void" button next to the individual row of the product/form you are looking to change.

If you generated more than one contract and would like to display all contracts and forms at once, click "Display All" at the bottom of the page. This will combine all of the product PDFs into a single file that can be downloaded or printed.
You may also void all of the contracts and forms at once using the red Void All button.
Tip: When voiding, there are a couple of things to keep in mind. Firstly, once a contract has been voided, its contract number is gone and will never be used again. Secondly, you can void within MenuMetric until your vendor has finalized the contract on their side. Contract finalization by the vendors is typically the point of remittance but may vary depending on your vendor's requirements.